Brushing alone will not get all the plaque and little bits stuck between your teeth out, which is why it is recommended to floss daily. Flossing helps reduce your risk of suffering from serious gum problems and rids you of bad breath. While there are many benefits to flossing, most people are missing out on healthier teeth because they simple don't know how to floss. To help keep your teeth at their healthiest condition, continue reading to learn the best way to floss your teeth.
Step-by-Step Instruction of Flossing
Types of dental floss
When it comes to flossing, there are a few varieties that you can choose from. Waxed, unwaxed, unflavored and flavored flosses are all available and what you choose really depends on what you personally prefer. Aside from these varieties, you want to know the basic flosses to choose from and decide which may be better suited for your teeth.
Nylon or multifilament floss consists of a number of nylon strands. This type tends to be stringy and more prone to breaking while flossing. You can find this floss in either waxed or unwaxed.
PTFE monofilament floss of single filament floss is made with only one strand of thread. This type of floss tends to be better for getting in between teeth since it can easily get between the tiniest of spaces. While this floss can be more expensive, you are less likely to have shredding when using and it lasts for a long time, so you won't need to spend money on floss too often.
Tape floss or super floss is also available if you have slightly wider gaps between your teeth. This type of floss is typically used to help clean braces or dental bridges and can be more effective at cleaning teeth that have larger gaps between them.
Getting ready to floss
You want to begin by taking about a 20-inch section of floss and wrap it around the middle fingers. Before discussing how to floss, you want to know you can either floss before or after brushing your teeth. Flossing before you brush your teeth can allow more fluoride to penetrate deeper between the teeth and ensure you remove any particles left from flossing. Flossing after you brush allows for most particles and foods bits to be removed.
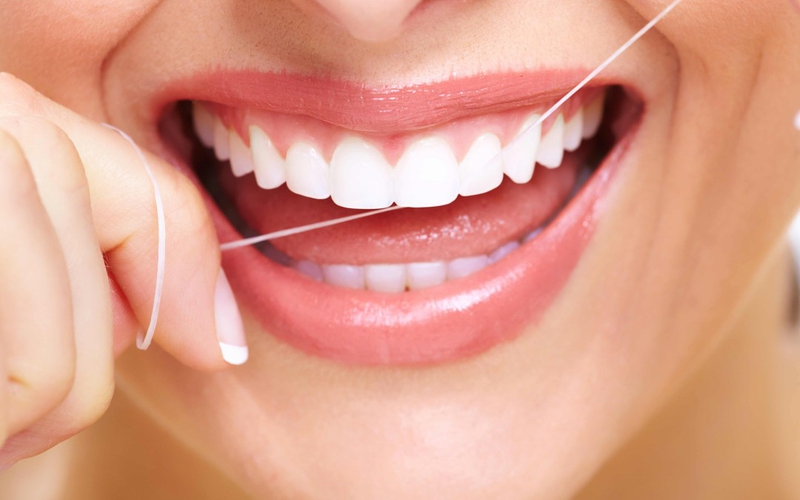
Holding the floss
After wrapping the floss between your middle fingers, you want to hold the floss using your thumb and pointer finger. There should be about 4 inches of floss to work with after you have grabbed it with the thumb and pointer finger.
Flossing
When flossing the top teeth, it is best to use your thumbs to guide the floss between the teeth. When flossing the bottom teeth, it can be easier to use the
Where to start
While you can begin flossing on any tooth, most people find it easier to begin between the top two center teeth. However, it doesn't matter which area you begin with, it only matters that you floss between every tooth. Once you have chosen where to start you want to gently glide the floss between the teeth and rub the floss back and forth. Avoid
Flossing direction
Once you have the floss in place between your teeth, you'll want to create a C-like shape with the floss. Use a back and forth motion to remove all the hard to reach plaque and particles between the teeth. You want the floss to dip into the gum line by a few millimeters and curve it around the bone by moving in an up and down motion. How to floss near the gum line? You want to ensure you are reaching the contours of each tooth.
Floss each tooth
You don't want to try to speed up the process by wrapping the floss around the tooth to reach between both sides at once. Instead, floss between each tooth separately so you can be more precise in the cleaning efforts. If you need a cleaner area of floss, simply unravel it from the middle finger. It is recommended you use a clean area of floss for each tooth, which may require needing to get an entirely new piece of floss. Don't be alarmed if your gums bleed. If you don't floss often, bleeding gums is a sign that you should be flossing more often, typical the bleeding and swelling will occur less the more often you floss.
Don't miss the hard to reach teeth
The back of the mouth is often where gum disease or tooth decay begins and occurs, so you don't want to miss the back molars when flossing. It can be more difficult to reach this area but it is a vital step in flossing. Guide the floss between the back molars and pull the floss towards the front of the mouth to clean the area.
Rinse
Once you have flossed all your teeth, you want to rinse your mouth with water or mouthwash. This will allow most of the debris leftover from flossing to be cleared away, as well as help dislodge any particles left behind that were not removed while flossing. A chlorhexidine mouthwash is more effective at ridding bacteria from the mouth while also providing additional protection to the teeth and gums.
Repeat
How to floss for healthier teeth is something that needs to be done on a regular basis. You should get into the habit of flossing at least once a day for two or three minutes. If you have
Other flossing options
Flossing holders tend to be a “Y” shaped device that holds the floss for you. They make floss easier without too many directions.
Floss threads are great to use if you have had any dental work.
Water flossers
use
Additional things to remember
The back teeth collect more particles because of all the ridges they feature. It can take 20 minutes for plaque to formed on these teeth which is why you should always take the time to floss them thoroughly every day.
While you want to be effective in your flossing efforts, it is also important to be gentle during the process, especially when using an electric flosser. Before using an electric flosser, be sure to read the direction and know how to properly use it before you begin.
View All Comments /Add Comment